Thursday, February 24, 2011

class notes 2/24


Artists/topics from the presentation today:

Kazimir Malevich

Rodchenko

Wassily Kandinsky

Cubism

Marcel Duchamp

Luigi Russolo

Sol Lewitt


(what do you think? is conceptual art not "real" art? One of my favorite conceptual artists is Yoko Ono, before the Beatles ruined her rep as an amazing artist!)


HW: Do a line drawing using only the pen tool! Start Tracing your portrait, and feel free to clean up your musical drawing. You can use layers to build up the face of your portrait. (save as *.ai)


Next Monday 2/28 is an artist talk with Mary Early at 4:45-5:45 in Library 321! She will be the guest juror for the student show, and knows a lot about the DC art scene, it would be great to go listen to her!


Also remember the LAST TFMS animation series screening is also on Monday 2/28 at 8:15pm in Cole Cinema. This one will be with Lewis Klahr, a "cut and paste" animator

Tuesday, February 22, 2011

Class Notes 2/22


Vectors:

-photoshop is a bit map image (a gridded image with pixels)

-Vector-based images define a fill between two points with a slope--this leads to smaller image sizes which you can enlarge infinitely

most logos are done in illustrator! It's a very clean, graphic program


Illustrator:

-The interface in Illustrator is very similar to photoshop, yay!

(Unfortunately: no history (but you can undo infinitely with command+z and delete))

-the area inside the box is your print area: you can always resize this, as you have an infinite canvas around it

-We create a path, with a stroke that is editable, and can be filled

-Illustrator, like photoshop, is all about layers, which you should name and/or color code!!


-Pen tool (P): define a beginning point with one click, then define your end point with another click--you can then stretch and alter the curve of your line

-with pen tool you can create closed forms, which can be filled or transformed/moved with select tool (just like photoshop)

-Add Anchor Point and Delete anchor point can add or delete points within your vector

-Convert Anchor Point allows you to change a corner point to a smooth point and vice versa; if you click on one handle, you can create a combination point

-Corner Point: one single click creates hard angles with corner points

-Smooth Point: click and drag to create curved lines

-Combination Point: one side is smooth, one is a corner point


-Selection Tool (V): allows you to select a path or use a click+drag to select the path

-Direct Selection(A): you can click and directly edit one point on a line/object

-Command+Y: shows your path, underneath any edits to color/stroke

-Spacebar: gives you a hand to drag around the image

-Object->Group: allows you to group and alter together separate paths


Here for your reference: a handy list of Illustrator keyboard shortcuts


HW: At least one blog post by the end of this week! Also, do the Paul Hertz reading on Bb. Take 5+ portrait photographs (self-portraits or portraits of other people) and upload to blog.


Remember next Monday at 8:15 in Cole is the last of the film series with Lewis Klahr!

Thursday, February 17, 2011

class notes 2/17

Website Setup:

Main folder = root folder

In web design, you design locally (on your computer), and then you upload it to the (remote) server, where it can be viewed by everyone.


To connect to Server:

Site->Manage sites

New site

The HTTP Address (URL) of your site is http://students.smcm.edu/yourusername

No to server technology

You want to connect with FTP: your hostname is www.smcm.edu, you skip the folder space, and put your Email username and password and click on Use Secure FTP.


if you change your email password make sure that you change it in Dreamweaver!!


index.html is the first page your browser will direct to!


HW: Scan your signature, create a blog post!


Note that MONDAY FEBRUARY 21ST, our own professor Friebele is participating in a panel on "Public Art, Community, and Politics", at 4:45 in Cole Cinema.


Also on Monday at 8:15pm in Cole is the next part of the Animation series, with filmmaker Jim Duesing!

Tuesday, February 15, 2011

Class Notes 2/15

Remember that you need to complete your SELF ASSESSMENT and any remaining EDITS to Project 1 by Thursday!

Also, an Art/Museum Studies event this Wednesday: Art History Lecture: Dr. Elizabeth Chew, Meals Fit for a President: Jefferson's and Madison's Culinary Tastes, 4:15pm in St Mary's Hall

Thursday, February 10, 2011

class notes 2/10


For all you guys who missed Ryan Browning's talk, it was really great and (surprisingly to me) relevant to digital art!! He working in traditional media but his sources and references are the awkwardly rendered early 3-d polygonal graphics of video games (such as Everquest). Definitely check out his website if you have a chance and missed his lecture, you might see something you connect to!


ALSO on Monday (8:15pm in Cole Cinema) is the first night of the TFMS Film series on Animation!! Karen Aqua will be presenting a series of her animations, which I know I'm excited about! If any of you are interested in film, animation, or time-based art, you should definitely check it out!!!


HW: Remember to finish your FIRST PROJECT, and e-mail Billy with any work in progress updates or images, as well as just talking about how your project is working out conceptually or visually. When you're FINISHED your image, FLATTEN it and save it as a JPG, which you should post to your blog or at least email to billy (and remember to keep a *.psd file so you can keep on editing the image!!)

Tuesday, February 8, 2011

Class Notes 2/8

Dodge, Burn, Sponge Tools:

toggle between the three by pressing Shift-O.

Dodge - Lightens pixels where you paint.

Burn - Darkens pixels where you paint.

Sponge - Saturates or desaturates the pixels where you paint.


dodge/burn can be set to highlights, midtowns, shadows--also can change the exposure of these tools (default is 50, 25 is gentler)


Clone Stamp:

clone stamp copies from one area of the canvas to paint onto another area--very good for seamless transitions when erasing an object from the image.

use the S key to pick clone stamp

hold down alt and click to select clone area

paint with the brush just like any other brush--photoshop will show you where the source of your brush is

work from small areas--you will probably have to reselect your source over the course of cloning over an image.

cloning before:

cloning after:


Some tutorials I found today that might help you guys too:

How to let an image fade through a gradient

How to create a custom pattern (which you apply to the image via the pattern stamp tool, in the same area as the clone stamp tool)


REMEMBER, These projects are due in one week!! We have all Thursday as a studio day, and the weekend to work on them!

Thursday, February 3, 2011

Class Notes 2/3

Photo Retouching:


Backlit Mushroom:

Image->Adjustments->Color Balance


Image->Adjustments->Variations

if you go too far adding more of a color, hold the option key and the cancel button will turn into a reset button

after variations, go to Edit->Fade Variations to tone down a variation that too crazy


Image->Adjustments->Hue/Saturation…

Hue-moves color wheel around

saturation-how intense the color is

lightness-lighter/darker

can pick specific colors to edit the hue/saturation/lightness in (blue, red, yellow)

eyedropper with + symbol can select very specific colors (such as the dark green in the trees in the background)

as with variations, you can go to Edit->fade variations!

remember to check and uncheck the preview box so you can compare the before/after images!


Color Cast Chicken:

Image->Adjustments->Levels

can change the upper and middle registers of specific colors (red/green/blue)--if you pull down the upper arrow where there is little blue, it adds more blue in the image! very helpful to get rid of yellowing/strange color cast on the image

Image->Adjustments->Brightness/Contrast

brighten the image, or bring the contrast down (or up)

Image->Adjustments->Shadows/Highlights

click on "show more options" at bottom left to expand options here


Image->adjustments->curves

move around the entirety of your curves to adjust the colors (this one can be touchy! This is similar to levels, but a different visualization


Auto levels, Auto contrast, auto color can help you too, but sometimes the computer doesn't get it all right!


Some handy Photoshop websites/artists for inspiration:

Pxleyes

Worth 1000

Bert Monroy (Damen)

Shot By Robert (game glitches)

Kyohei Abe


Look at the comparison here:
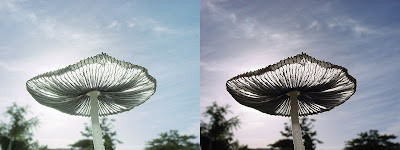


Remember: Photoshop CANNOT fix an image that is out of focus!


HW: Start working on Project 1! (267-300 dpi, approx max 24 inches in any direction)

FIELD TRIP SATURDAY. Meet at loading dock at 9:15AM!


Map to branch Ave:


View Larger Map


NPG metro stop is Gallery Place-Chinatown, and the gallery is there once you walk out (if you take the 7th and F st exit) in case you're going separately. Bring some metro fare!


map to gallery:


View Larger Map


here is parking near the NPG for those driving


Kupferminc

Traveling to my messy smp studio!!

Tuesday, February 1, 2011

Class Notes 2/1

Project 1: Remix

a few notes about this:

-use your scans, classmate's scans, and legally appropriated images to construct some sense of reality

-create a sense of space through the image--a landscape, a room, etc

-does not need to be "realistic", but don't follow any photoshop cliches! (unless you have a reason to do that)


PLACES TO GET IMAGES:

-Wikimedia Commons- all of these images are free to use, if you look at the licensing info you will see specifics about the image

-Flickr-some images are protected by their owner--if it has a "creative commons" license you can use it Here's the section for CC images

-NASA website has a lot of sweet large resolution images; a lot of government websites do this: Directory of .gov images (careful, some of these are copyrighted!)

-you can search for "public domain images"--such as this website


grab large images--- in the thousands of pixels, dimensionally


Photoshop:

Brushes:

-make sure you select the pencil in photoshop, then choose the brush tool! art history brush is not the same as the brush

-you can change size, hardness of your brushes, opacity, and flow through the menu at the top of the page

-you will notice that differing levels of pressure on your tablet change the flow/thickness/opacity of your brush--just like a real paintbrush! the "eraser" on your tablet pen will also erase on the image

-Brush window (can of paintbrushes in the right menu) will give you some more control on your brush

-you can find additional photoshop brushes online, and append them to your in-program brushes (quick example of a collection of these) http://getbrushes.com/

Image->rotate canvas to rotate sideways images, etc

Pen Tool: define the edges of the line then alter the way the line angles

Shape tools: you can specifically fill it, choose specific shapes


HW: if you haven't finished your Kupferminc image, finish that bad boy and put it on your blog!

Artist post from Mark Tribe reading, Rhizome or eyebeam.org

Bring a digital copy of an ugly photo to class (colors off, flash, back lit, weird colors)


REMEMBER FIELD TRIP THIS SATURDAY!!

meet at loading dock at Monty at 9:15 Saturday morning